Upgrade Your Home Decor with a DIY Wood Framed Mirror
A wood-framed mirror can be a beautiful addition to any room in your home. Not only does it provide a functional piece for getting ready in the morning, but it can also add a touch of rustic charm or modern elegance to your decor. While there are plenty of pre-made options available to purchase, creating your own DIY wood framed mirror can be a fun and rewarding project. In this article, we'll guide you through the step-by-step process of creating your own custom wood framed mirror, from selecting the materials to hanging it on your wall.
What do you need?
Saw (or get the wood pre-cut at your hardware store)
Staple gun (optional)
Wood for the frame (As straight as possible. Width = basic 1x3. Length – see below).
Wood stain
Paintbrushes
Metal L-shaped brackets x 4
Black paint for metal
Screws (size depends on thickness of wood)
Drill
Countersinking tool
Screwdriver
Pencil
Wall hooks
Protective goggles
What do you have to do?
Step 1: Cutting wood for the DIY wood framed mirror
This DIY wood framed mirror is intended to look rustic so the frame is really easy to make.
(TIP: Try to get wood that is as straight as possible. It took me a while to find the straightest pieces. Some of the pieces I picked out were twisted and warped. I would have had a really hard time getting my frame to lay flat if I had used those.)
Cut two pieces of wood the same length as the top and bottom of the mirror. Don't forget to wear protective goggles to protect your eyes from stray bits of sawdust and splinters.
Then cut two more pieces for the sides which are the size of the mirror plus the width of the top and bottom pieces of the wood frame.
Step 2: Staining the wood
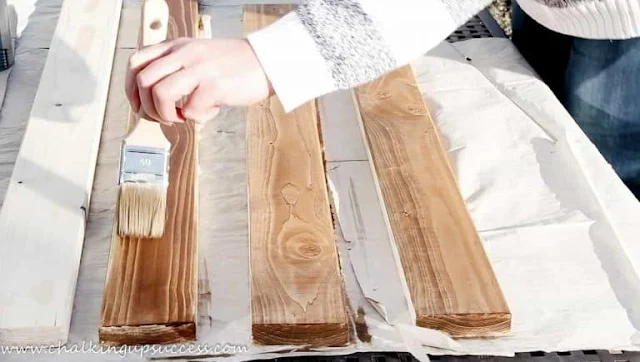
Use a wood stain that suits your home. I already have some leftover from upcycling the wooden trunk so I'm using that. Now the mirror and the wooden trunk will have the same wood tones.
Paint the wood stain onto the wood with a brush. I brushed on around three coats of wood stain. Just keep applying until the wood is as dark as you want it. Leave each coat to dry before applying the next.
Step 3: Paint the metal corner brackets
Adding L-shaped corner brackets not only gives the mirror frame a more industrial look but also makes the wooden frame a solid piece. If like me, you can only get galvanised corner brackets, you can paint or spray them with black paint for metal. I already have some black metal paint so that's what I'm using.
(TIP: For painting screw heads. Push the screws into a cardboard box. Now you can paint them without getting paint all over your hands and without smudging the paint.)
Step 4: Assemble the DIY wood framed mirror
Turn the pieces of the frame over so that the stained side is facing downwards. Place the wooden pieces together to make a frame.
Use a staple gun to staple all four corner joints together. This is just to stabilize the frame until we add the corner brackets.
Carefully turn the frame over so that the wood stained side is facing upwards.
Position the corner brackets into the corners. Screw the brackets onto the DIY wood framed mirror.
(TIP: Start by attaching the corner screw. Don't screw it in too tight at this stage. Make sure the bracket is straight and then attach the screws at the outer ends. Attach the inner screws and then tighten all the screws on the bracket so that they are tight but not overly tight.)
Step 5: Attaching the wood frame to the mirror
Turn the wooden mirror frame over again, so that the stained side is facing downwards.
Place the mirror on top of the frame. Now we are going to screw the mirror to the frame.
Remember I had an overlap of 2cms around the mirror to the end of the MDF surround. That's where I'm going to attach the wooden frame to the mirror.
Use a pencil to make marks around the mirror frame where you want to attach screws. I'm making marks at around every ten centimeters.
Step 6: Countersink the screws
Next, use a drill to pre-drill the holes following your pencil markers.
If you want the screws to sit flush with the back of the mirror you will need to countersink the screws. Use a countersink attachment on your drill to pre-drill the holes for this. Again, wear protective goggles for this job.
Use a screwdriver to drive the screws into the wooden frame. My screws were the depth of the MDF base plus half the depth of the wooden frame.
Step 7: The DIY wood framed mirror is finished!
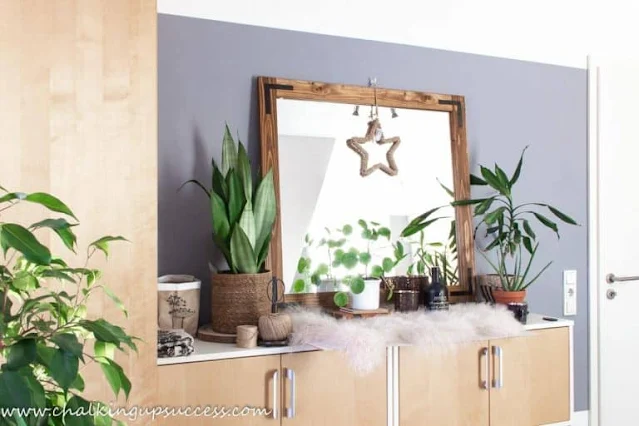
A quick styling session with the mirror before passing it on!
Now, all that is left is to hang the DIY wood framed mirror. As you can see from the photo above, my mirror already has attachment holes on the back of the frame from when it was hanging on a bathroom wall.
Designing your own furniture can be a rewarding and cost-effective way to furnish your living space, whether you're a student or simply on a budget. With the right approach and tools, you can create unique and stylish pieces that reflect your personal taste and complement your decor.


Comments
Post a Comment